2017-03-26

Write The FAQ ‘n Manual (Part 4)

Automated Documentation in a CI/CD Pipeline for PowerShell Modules with PlatyPS, psake, AppVeyor, GitHub and ReadTheDocs


Part 4: Monitoring the Build, PowerShell Magic, Looking Forward, and Closing Thoughts


Monitor the Build Status


AppVeyor

Once the release has been pushed to GitHub, the behind the scenes webhook for AppVeyor is triggered and your build will be queued on AppVeyor. If you did your required reading, this part should be familiar to you. What we are looking for is the parts of the documentation build in the output. You can look at this build of the example project to see the full output: https://ci.appveyor.com/project/markekraus/autodocumentsexample/build/1.0.6

BuildDocs Task:

PostDeploy Task:


ReadTheDocs

ReadTheDocs will preform 2 builds. It will build once when your do you push your release to GitHub and again when AppVeyor pushes the build changes back to GitHub. The first build may only show as triggered if the AppVeyor build finishes before the first ReadTheDocs build completes. ReadTheDocs doesn't have a live feed of the build process like AppVeyor does, but you can see the results of builds. You can see the build that followed the above AppVeyor build here: https://readthedocs.org/projects/autodocumentsexample/builds/5198207/

You can get here by doing the following
  1. Go to your dashboard https://readthedocs.org/dashboard/
  2. Select your project
  3. Go to the Builds tab
  4. Click the desired build


Pull the Build Changes to your Local Git Repo

You will need to remember that since the build process pushes changes back to GtHub, you will need to refresh your local repo. This is done with git pull:
git pull


So, Where's the PowerShell?

This is a PowerShell blog and so far in this series not much PowerShell has been discussed. As I stated before, the magic is happening in /psake.ps1: https://github.com/markekraus/AutoDocumentsExample/blob/master/psake.ps1

Build Task

The Build task contains the code that Adds /RELEASE.md to the ReleaseNotes in the module manifest, maintains the /docs/ChanegLog.md and adds the version and date to /REALEASE.md.

https://github.com/markekraus/AutoDocumentsExample/blob/master/psake.ps1#L114
    # Update release notes with Version info and set the PSD1 release notes
    $parameters = @{
        Path = $ReleaseNotes
        ErrorAction = 'SilentlyContinue'
    }
    $ReleaseText = (Get-Content @parameters | Where-Object {$_ -notmatch '^# Version '}) -join "`r`n"
    if (-not $ReleaseText) {
        "Skipping realse notes`n"
        "Consider adding a RELEASE.md to your project.`n"
        return
    }
    $Header = "# Version {0} ({1})`r`n" -f $BuildVersion$BuildDate
    $ReleaseText = $Header + $ReleaseText
    $ReleaseText | Set-Content $ReleaseNotes
    Update-Metadata -Path $env:BHPSModuleManifest -PropertyName ReleaseNotes -Value $ReleaseText
    
    # Update the ChangeLog with the current release notes
    $releaseparameters = @{
        Path = $ReleaseNotes
        ErrorAction = 'SilentlyContinue'
    }
    $changeparameters = @{
        Path = $ChangeLog
        ErrorAction = 'SilentlyContinue'
    }
    (Get-Content @releaseparameters),"`r`n`r`n"(Get-Content @changeparameters) | Set-Content $ChangeLog


BuildDocs Task

The BuildDocs task is responsible for creating /mkdocs.yml, copying /RELEASE.md to /docs/RELEASE.md, and creating the function markdown files under /docs/functions/.

https://github.com/markekraus/AutoDocumentsExample/blob/master/psake.ps1#L174
Task BuildDocs -depends Test {
    $lines
    
    "Loading Module from $ENV:BHPSModuleManifest"
    Remove-Module $ENV:BHProjectName -Force -ea SilentlyContinue
    # platyPS + AppVeyor requires the module to be loaded in Global scope
    Import-Module $ENV:BHPSModuleManifest -force -Global
    
    #Build YAMLText starting with the header
    $YMLtext = (Get-Content "$ProjectRoot\header-mkdocs.yml") -join "`n"
    $YMLtext = "$YMLtext`n"
    $parameters = @{
        Path = $ReleaseNotes
        ErrorAction = 'SilentlyContinue'
    }
    $ReleaseText = (Get-Content @parameters) -join "`n"
    if ($ReleaseText) {
        $ReleaseText | Set-Content "$ProjectRoot\docs\RELEASE.md"
        $YMLText = "$YMLtext  - Realse Notes: RELEASE.md`n"
    }
    if ((Test-Path -Path $ChangeLog)) {
        $YMLText = "$YMLtext  - Change Log: ChangeLog.md`n"
    }
    $YMLText = "$YMLtext  - Functions:`n"
    # Drain the swamp
    $parameters = @{
        Recurse = $true
        Force = $true
        Path = "$ProjectRoot\docs\functions"
        ErrorAction = 'SilentlyContinue'
    }
    $null = Remove-Item @parameters
    $Params = @{
        Path = "$ProjectRoot\docs\functions"
        type = 'directory'
        ErrorAction = 'SilentlyContinue'
    }
    $null = New-Item @Params
    $Params = @{
        Module = $ENV:BHProjectName
        Force = $true
        OutputFolder = "$ProjectRoot\docs\functions"
        NoMetadata = $true
    }
    New-MarkdownHelp @Params | foreach-object {
        $Function = $_.Name -replace '\.md'''
        $Part = "    - {0}: functions/{1}" -f $Function$_.Name
        $YMLText = "{0}{1}`n" -f $YMLText$Part
        $Part
    }
    $YMLtext | Set-Content -Path "$ProjectRoot\mkdocs.yml"
}
You'll notice that the code imports the updated module into the Global scope. Some combination of PlatyPS, AppVeyor, and psake makes this a necessity. I suspect it is a PlatyPS issue, but I haven't had time to dig through their source code.

You will also notice that this deletes all of the current function markdown files. This is so functions removed from the project no longer had lingering documentation and because PlatyPS doesn't play nice with preexisting files (at least in my testing they did not).


PostDeploy Task

This task is slightly different. It's not really PowerShell. If someone has a good (this is the key word: good) PowerShell implementation of git, please let me know. All of the ones I have tried are just as terrible as doing what I have done here.  I yearn for a PowerShell native implementation of git. I wont post all of it here since it;s not truly PowerShell, but I will explain some of it. The code beings here: https://github.com/markekraus/AutoDocumentsExample/blob/master/psake.ps1#L251

https://github.com/markekraus/AutoDocumentsExample/blob/master/psake.ps1#L258
        "git config --global credential.helper store"
        cmd /c "git config --global credential.helper store 2>&1"
The first line is just to "echo" the command that is being run to AppVeyor. That makes it easier to trace down where something went wrong. Just be careful not to expose your GitHub access token and probably not the email address either.

All of the git commands are redirecting stderr to stdout and this is being done in CMD, not PowerShell. The reason for this is that I want verbose output from the git commands displayed in in the AppVeyor output. git.exe puts informational text into stderr. PowerShell interprets a non-empty stderr from an evaluated command as something went wrong with the command. Now, it's debatable whether git.exe putting info in stderr is bad or PowerShell interpreting stderr content as an exception is bad, but this is the mess we have to deal with.

I tried several different workarounds, but ultimately this got me where I wanted. It has some drawbacks. For example, this means there is no error checking. I realize there is a git.exe option that drops informative text and thus only error when there really is an error. As I indicated, I wanted verbose output. This came up in one of my build attempts:

https://ci.appveyor.com/project/markekraus/autodocumentsexample/build/1.0.5

You can see git had a fatal error, but since I'm crippling the errors on this and not implementing my own error checking the build passed even though git failed.


Help.Tests.ps1 Pester Test

I also indicated my Help.Tests.ps1 is slightly different form others. My looping is a little different. I loop around each function because I need to test for a HelpUri.

https://github.com/markekraus/AutoDocumentsExample/blob/master/Tests/Help.Tests.ps1#L10
    foreach($Function in $Functions){
        $help = Get-Help $Function.name
        Context $help.name {
            it "Has a HelpUri" {
                $Function.HelpUri | Should Not BeNullOrEmpty
            }

I am also testing for the existence of at least one .LINK
https://github.com/markekraus/AutoDocumentsExample/blob/master/Tests/Help.Tests.ps1#L16
            It "Has related Links" {
                $help.relatedLinks.navigationLink.uri.count | Should BeGreaterThan 0
            }


未来へ(To the Future)

There is much to be improved on. This is just a start for me. Well, more like a point just beyond the start as this is already several iterations in. There are several flaws in this process.

During the writing of this blog series it became apparent to me that prepending /RELEASE.md to /docs/ChangeLog.md on every build was probably a bad idea. It's probably better to do this part only on deployment builds. This way you could keep /RELEASE.md updated as you make minor changes to the code base without /docs/ChangeLog.md getting cluttered with a bunch of junk and repetitions. This of course means rethinking all of the documentation build logic to accommodate.

Another thing that needs improvement is figuring out a way to have ReadTheDocs only build after an AppVeyor commit instead of every GitHub commit. That would also mean some other build logic to handle documentation only repo updates.

I would also like to find a way to keep the default ReadTheDocs build to match the current version available on PowerShell Gallery. At least, I'd like a way to connect the published versions of the code back to the correct documentation version. I don't really see how that is possible though. Maybe further manipulation of /mkdocs.yml could achieve that. I need to research deeper.

I definitely need to get some error detection around my git code in /psake.ps1. I researched how other major projects were doing this. Many of them are just doing their git directly from /appveyor.yml. But, I want to keep /appveyor.yml as a configuration only and /psake.ps1 as code only. Which brings me to my final point:

I would like to move more of the configuration out of /psake.ps1 and into /appveyor.yml. Basically, anything static should be in /appveyor.yml (e.g. change log path) and anything that needs to be dynamically generated (e.g. build version) should be in /psake.ps1.


Closing Thoughts

I hope this series has been helpful and informative. I hope the amount of time and effort I put into it shows. Most of all, I really hope to see more documentation processes included in PowerShell build pipelines, even if what I have done here provides no help other than to raise it to the level of attention it deserves. If you have corrections, suggestion, or comments, please don't hesitate to let me know. Thanks for reading!

Go Back to Part 3

Write The FAQ ‘n Manual (Part 3)

Automated Documentation in a CI/CD Pipeline for PowerShell Modules with PlatyPS, psake, AppVeyor, GitHub and ReadTheDocs


Part 3: mkdocs & Release Preparations and Pushing the Release

Prepare /header-mkdocs.yml

As explained before, the /header-mkdocs.yml file is used to generate the /mkdocs.yml file which is by ReadTheDocs to create the documentation site.  For the most part you can take the /header-mkdocs.yml file from the AutoDocumentationExample project and modify it for your needs. Just remember that any changes you make to /mkdocs.yml will be overwritten by the build process. Any changes you want to make should be made to the /header-mkdocs.yml instead.

For full documentation on mkdocs.yml, you can read more here: http://www.mkdocs.org/user-guide/configuration/

If you just want to grab, modify, and go, here are some of the lines and what they mean
  • site_name is used to create the name or tile of the documentation site
  • repo_url contains the link to the project repository on GitHub
  • site_author is the Name of the person, persons, company, or organization responsible for the project
  • edit_url is a relative path from the URL defined in Repo_url to edit items. This will be used for construction “edit this page” type links. This is very useful for all of your pages that are not automatically generated by PlatyPS.
  • copyright contains a line about the copyright notices for the project and documentation.
site_nameAutoDocumentsExample - Write The FAQ ‘n Manual
repo_urlhttps://github.com/markekraus/AutoDocumentsExample
site_authorMark Kraus
edit_uriedit/master/docs/
copyright"AutoDocumentsExample is licensed under the <a href="https://github.com/markekraus/AutoDocumentsExample/raw/master/LICENS">MIT license</a>"


Themes

Themes can be used to change the look and feel of your documentation site. ReadTheDocs comes with 2 built-in themes: mkdocs and readthedocs. You can see the themes and read more about styling at http://www.mkdocs.org/user-guide/styling-your-docs/

For simplicity, you can choose one of the default themes by modifying theme in the /header-mkdocs.yml.
themereadthedocs

If you want to use someone else’s theme or create your own, you will need to include the theme folder in your project. Then instead of theme, you will need to use theme_dir. I recommend crating a /docs/themes/ folder and then adding the theme folder under there. For example, for a brief period I was using the PSinder theme on the PSMSGraph RedTheDocs site. I did this by placing the PSinder files in /docs/themes/psinder/ and then setting theme_dir to docs/themes/psinder in /header-mkdocs.yml.
theme_dirdocs/themes/psinder

You may want to play around with this a bit before committing to a theme. In my experience the readthedocs theme is the best in terms of working with large numbers of pages, though I’m not exactly thrilled with the aesthetics of the theme. The mkdocs and derivative themes like Cinder and PSinder do not work well with sections that contain a large number of pages. I found that many of my function pages were not selectable in the drop-down menus because they were displayed off screen with no scrolling available. If your project has only a few functions, this might not be an issue.


Additional Pages and Sections

You are not limited to the pages and sections provided here. It is entirely possible to extend this. The idea is that the Functions will be tacked on as individual pages under a Functions section. To add addition pages create them as .md files under /docs/. You can even create more folders under /docs/ to group similar pages or a section. Then just update the pages section in /header-mkdocs.yml

For example, I plan to add an Examples section to PSMSGraph. To do so I will create the /docs/Examples/ folder, add several files (/docs/Examples/example01.md, /docs/Examples/example02.md, etc). and then update /header-mkdocs.yml like so:

pages:
  - Homeindex.md
  - Examples:
    - Retrieving Organization DetailsExamples/example01.md
    - Uploading a file to OneDrive for BusinessExamples/example02.md
    - Adding a Calendar EventExamples/exampled03.md


Preparing for Release


Assuming you have updated your code, updated the relevant comment based help, and have your /header-mkdocs.yml configured to your liking, you should be ready to publish a release and deploy your module. Before that, you should update your release documentation.

There are two pieces to the release documentation: /RELEASE.md and /docs/ChangeLog.md. /RELEASE.md is intended to function as the Release Notes which document the changes and features added in the current release. /docs/ChangeLog.md is indented to house the current release notes and the release notes for all previous releases. Before you push your release, /RELEASE.md needs to be updated. You do not need to update /docs/ChangeLog.md as the build process will maintain it for you by prepending /RELEASE.md to it.

/RELEASE.md is a markdown file so you use markdown formatting or plain text. It will be included in the ReadTheDocs documentation site. It will also be added to the ReleaseNotes field in the module manifest which ultimately means it will also display in the PowerShell gallery if you are publishing there. Currently, the PowerShell gallery does not format the markdown in the release notes. With these in mind, here are some recommendations for formatting /RELEASE.md
  • Keep to simple formatting so it is still readable as plain text
  • The Version number and date are prepended to the file with a # heading. Use ## for major headers instead of # in your body
  • Use ### for subheadings
  • Consider using just URLs and not trying to create formatted links
  • Consider alternating bullet types for each indentation level:
* First Level
    - Second Level
        + Third Level


The formatting is really up to your preferences. The only hard recommendation I have is the one about the heading levels. The reason for this is that with the version being made the H1 header, the /docs/ChangeLog.md will create better sectioning with all the relevant changes for a specific version nested under the version header as H2 headings.


PowerShell Syntax Highlighting

Unfortunately, ReadTheDocs doesn’t really support PowerShell syntax highlighting for script blocks, but, GitHub does. Also, PowerShell Gallery does not do any formatting. It would probably be best to avoid putting script blocks in your /RELEASE.md so it has a somewhat consistent look across all three services. If you do add script blocks in any of your pages, consider using the following method:

```powershell
$Widgets = Get-Widget 
```

Using that will have the proper syntax highlighting on GitHub and on ReadTheDocs it will appear as a normal preformatted text block. If ReadTheDocs should add PowerShell syntax highlighting in the future, this should be forwards compatible.


Git: Stage, Commit, Push

At this point your code has been updated and your release has been prepped. It is time to work some Git magic. This part should be all too familiar at this point. There is one thing to which I wanted to draw attention and that is the commit message. Our build process can be skipped by including the following string anywhere in your commit message:
  • [ci skip]
  • [skip ci]
  • [skip appveyor]
Note that the square brackets must also be included. This is good for actions such as commits which only update the /README.md or staging the /RELEASE.md before merging code. Using these will result in the commit and push not triggering the build pipeline on AppVeyor and thus your documentation should remain unchanged. However, this will not stop the documentation build on ReadTheDocs. If you edit files in the /docs/ folder and push those changes, ReadTheDocs will build the changes to the documentation even if you include the skip tags in your commit message.

Anyway, assuming you are ready to stage/commit/push:
git add -A
git commit -m 'First Release!'
git push


Go back to Part 2
Continue to Part 4

Write The FAQ ‘n Manual (Part 2)

Automated Documentation in a CI/CD Pipeline for PowerShell Modules with PlatyPS, psake, AppVeyor, GitHub and ReadTheDocs


Part 2: GitHub Access Token, ReadTheDocs Account & Project, and Comment Based Help


Generate and Configure a GitHub Personal Access Token


Since our Documentation Build process is part of our Build automation we will need to have a way for AppVeyor (where our build process is running) to write the documentation back to GitHub (where our documentation is stored). Obviously, this means we need a way to authenticate from AppVeyor to GitHub to make those changes. We could throw caution to the wind and just hard code our GitHub username and password into /psake.ps1, however, we are security conscious coders and would never do such a thing.

Lucky for us security conscious coders, GitHub offers what they refer to as Personal Access Tokens. These are neat for a variety of reasons such as providing scoped access and the ability to create one for every need. Best practice is to use One Personal Access Token for a single purpose and create more for additional requirements. That means that if you already have a personal access token used for something else, you will need to create a new one for this pipeline.

To create a Personal Access Token follow the instructions here: https://help.github.com/articles/creating-a-personal-access-token-for-the-command-line/ For our purposes, the only scope that is required is public_repo. I do highly recommend using a very useful and descriptive name. I also highly recommend storing the token in a password manager.

Security conscious coders also care about layered security. We do not want put this token in plaintext in our build code. Once you have your token, you will need to log in to your AppVeyor account and create a secure string for your token (as a refresher, you can read https://www.appveyor.com/docs/build-configuration/#secure-variables ).

Once you have the secure string, update /appveyor.yml and modify the access_token environment variable.


environment:
  access_token:
    secure+mnipwj1c7UIzB4XZzoxTTZEnsN/i6M3MyskHX/4wQUYCrCL5yQNR/1Qf1ws21bu


Create your ReadTheDocs Account and Project


We need a ReadTheDocs account for us to build our documents. I could not find a premade ReadTheDocs tutorial so for the benefit of all, I’m making one here. The TL;DR is to create a ReadTheDocs account, link your GitHub account, Import your GitHub Project, and modify the documentation type to mkdocs.

For those who want pretty pictures, here you go.

Create Your Account


  1. Go To https://readthedocs.org/
  2. Click the Sign Up button
  3. On the Sign Up Page enter a username, email address, and password
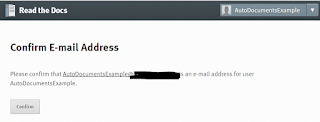
  4. On the next page click Confirm to confirm your email address
  5. Check your email and follow the email confirmation instructions


Link Your GitHub Account


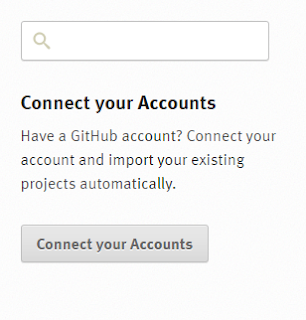
  1. On your landing page for your new account, Click the Connect You Accounts button
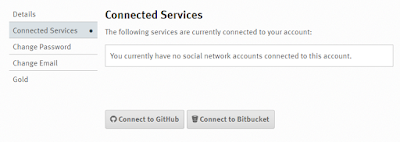
  2. Click the Connect to GitHub button
  3. Follow the instructions from GitHub for linking your account
  4. When you have finished you should see your GitHub account listed under Connected Services


Import Your GitHub Project and Modify the Documentation Type


  1. Got to your dashboard https://readthedocs.org/dashboard/
  2. Click the Import a Project button
  3. Under Import a Repository, click the Plus sign button next to your GitHub repo
  4. On the Project Details page Check the Edit advanced project options check box and click Next
  5. Locate the Documentation type dropdown box and choose Mkdocs (Markdown)
  6. Change the Programming Language to Other (☹ maybe PowerShell will be added someday)
  7. Modify the Project Home page (I use my GitHub repo as my project home page)
  8. Click the Finish button


Build your Comment Based Help


The source of all your function documentation will come from your comment based help. The build process will build your documentation directly from your comment based help. You should begin thinking of comment based help as a critical part of your code. If you want to ensure your documentation, you can pester test for it with  /Tests/Help.Tests.ps1 test included in the project will fail the build if:
  • HelpUri is missing from the function definition
  • There is not at least one .LINK entry
  • There is no .DESCRIPTION
  • There is no .EXAMPLE
  • There is not a .PARAMETER for every parameter
You should consider the following when writing your document based help
  • Check your spelling, punctuation and grammar
  • PlatyPS will mangle custom formatting, so keep it simple
  • PlatyPS will only create proper links when .LINK is a URL.
  • The first .LINK should be to the current functions own online documentation and should match the HelpUri
  • Include .LINK’s with the full URL to online documentation to related functions instead of just function names.
  • If your function calls another, add a .LINK to the called function’s online documentation
  • Include .LINK’s with the full URL to related documentation (API’s, MSDN, 3rd Party documentation, etc)
  • If one function has a .LINK to a second function, ensure the second function has a .LINK to the first function.
  • Add a .LINK to the GitHub page for the source code
  • Add a .OUTPUTS that contains a list of fully qualified type names of the objects types your function emits if any
  • Add a .INPUTS that contains a list of fully qualified type names of the objects types your function ingests if any
  • Be thorough in your description
  • Include at least one .EXAMPLE per parameter set
  • If your function includes pipeline support, include a .EXAMPLE for each
  • If your function includes positional parameter support, add a .EXAMPLE in addition to and not in replacement of a .EXAMPLE with fully named parameters
Most importantly, keep your comment based help updated.
  • If functionality changes update the .SYNOPSIS and .DESCRIPTION
  • If you add, remove, or rename a parameter, do the same with the .PARAMETER’s and .EXAMPLE’s
  • If you add a new function that will feed into or from another function update the other function’s .LINK’s.
  • If you rename the function, update the name in the .EXAMPLE
  • If a link changes for a function, update the related functions .LINK’s
You may have noticed this is very .LINK heavy. One of the benefits of online documentation is easily navigating to related documents. Normally, the .LINK’s are just the names of other functions. This is acceptable from the command line to see the related functions, but does us no good online. If you are not creating online documentation from the comment based help, the .LINK can be ignored, but for our purposes it becomes very important.

Comment Based Help for Get-Widget:

<#
    .SYNOPSIS
        Gets a  Widget from Widget store
    
    .DESCRIPTION
        Retrieves information about a widget from the widget store based on either ID or Name
    
    .PARAMETER Id
        GUID ID of the Widget
    
    .PARAMETER Name
        The Name of the Widget to retrieve from the Widget store
    
    .EXAMPLE
        PS C:\> Get-Widget -Id b54dfddd-f721-4d3a-ae8a-a1227315a66f
    
    .EXAMPLE
        PS C:\> Get-Widget -Name 'My Widget'
    
    .OUTPUTS
        widget, widget
    
    .NOTES
        Additional information about the function.
    
    .LINK
        http://autodocumentsexample.readthedocs.io/en/latest/functions/Get-Widget.md
    
    .LINK
        http://autodocumentsexample.readthedocs.io/en/latest/functions/Set-Widget.md
    
    .LINK
        https://github.com/markekraus/AutoDocumentsExample/blob/master/AutoDocumentsExample/Public/Get-Widget.ps1
    
    .LINK
        https://store.adatum-widgets.com/
#>


URL Notes

There are a few things to consider when you are creating your comment based help. First, PlatyPS will create the file names for the documentation passed on the function definition, not the name of the file in which the function is defined. Also, the URLs on ReadTheDocs are case sensitive. If you use a different casing strategy for the file names than you do for the actual function definition, this could lead to confusion. For example, if your function is in a file named Get-Widget.ps1 but the function definition has get-widget, then PlatyPS will create the file as get-widget.md.

Also, it is possible to create your .LINKs in the comment based help without creating the documentation first. The URL follows this convention:

<base ReadTheDocs domain>/en/latest/functions/<function name as defined in function definition>.md

To give you an idea of the URLs for a given function, here are some examples using the Get-Widget function from the AutoDocumentsExample project:


Go back to Part 1
Continue to Part 3

Write The FAQ ‘n Manual (Part 1)

Automated Documentation in a CI/CD Pipeline for PowerShell Modules with PlatyPS, psake, AppVeyor, GitHub and ReadTheDocs

Part1: Intro, Pre-reqs, Components and Build Workflow 


Intro

One of my least favorite parts of IT is documentation. It takes a significant amount of time to document things, sometimes longer than the actual work you are documenting. I’m not alone. I hear complaints from all levels about how much of a pain and bore documentation is. However, we all depend on it. The moment things don’t go as planned or expected we start googling for solution and digging through documentation hoping to find the answer. So, while documentation is absolutely evil, it is a necessary evil.

With PowerShell, and other programming languages, there is an added burden of needing to document in more than one place. For example, you may need in-code documentation for what you are doing and why, programmatic help systems (like PowerShell’s comment based help), external help, internal help, and online documentation. It can get overwhelming and will often dissuade people from documenting their code at all or at the very least result in their only documenting in one place.
I recently published my PSMSGraph module to the PowerShell gallery. One of my pet peeves about many gallery modules is that there is just no documentation. Some don’t even include comment based help or any useful comment based help. You are left with a trial-and-error based approach to using them. I wanted to avoid that for anything I publish to the gallery. I’m not trying to put anyone down, but I just wanted to make my own module easy, more accessible, and at least somewhat documented.

Personally, a year ago, I promised myself to commit to comment based help on everything. Every script and function I write now include comment based help. I really didn’t want to duplicate my efforts in documentation. Since I always have comment based help I began searching for a method of converting that to markdown and I stumbled across a few scripts until I found PlatyPS. For my ConnectReddit module I had very manual process where I ran a script to generate markdown documentation and then it had to be pushed to the separate wiki repo. It was painful and I hated it. Since PSMSGraph is now in a CI/CD pipeline, I spent some time integrating PlatyPS into my pipeline. Now I don’t even need to think about the documentation part outside of keeping my comment based help updated.

This 4 part blog series will cover how to implement this in your pipeline. Once done you will have automated function online documentation as part of your pipeline as well as an automatically managed Change Log based on your Release notes.


Before you Begin

Please note that this blog series is not intended as an introduction to PowerShell. This blog is intended for those already familiar with PowerShell. 

This blog series builds on the work of Kevin Marquette and Warren Frame. They both have excellent blogs on how to implement a CI/CD pipeline for module development. This blog is written with the assumption that you are familiar with GitHub, AppVeyor, and psake. If you want to learn those things, please stop here and go read their blogs. 

Required reading:
Comment based help is essential to this process. For a refresher or a primer, you can run 
Get-Help about_comment_based_help
or visit the following URL
Make sure you have a decent understanding of those concepts and technologies before moving on with this series or you are sure to be lost. I will try my best not to rehash anything covered in their post except where my process or architecture differs.

Also, I recommend taking a primer on both markdown and YAML. I don’t claim to be an expert on either, but some basic familiarity with them will be needed for this.
Finally, you might want to look at the PSMSGraph project and you will definitely want to look at the AutoDocumentsExample project that I will be using for this series. With the PSMSGraph project you can see the entire build process from start to finish and how it ends up looking in the PowerShell Gallery.


Components

Before I get into the nitty-gritty I figured it was best to name and describe the basic components that will be used to accomplish the goal of a CI/CD pipeline with automated documentation building. If you have done the “required reading”, some of this will be a review for you.


PlatyPS

PlatyPS is a PowerShell module for generating documentation. For our purposes, it has a very convenient capability of creating markdown help documents for an entire module. It has a lot of other features for external documentation that I will want to look at in the future.


AppVeyor

AppVeyor is a CI/CD build service. I like to think of it as a cloud Jenkins. It builds, tests, and deploys code. It also happens to be free for Open Source projects. Best of all, it supports PowerShell 5 which will be used to run the psake build.


psake

psake is a DSL build automation module for PowerShell. It makes it easy to create build automation processes. It makes it easier to code your process as a set of tasks and dependencies. The /psake.ps1 in the project is where most of the magic happens. It is run in the AppVeyor environment and makes all our calls to the PlatyPS functions as well as recommitting our changes


ReadTheDocs

ReadTheDocs is a community supported documentation build and host service. It supports mkdocs which turns markdown documents into HTML web pages. It supports a range of other documentation engines, but since we are using PlatyPS to generation in markdown, we will make use of the mkdocs engine. If you use their service, please consider contributing time or money. You can find more details about ways to contribute on their website.


GitHub

If this is the first you have ever heard of GitHub, this blog post is not for you. The role GitHub obviously serves here is the public version control repository for our code. When we commit to the repo it will fire off the webhooks for both AppVeyor and ReadTheDocs which will automagically fire up the build pipeline.


Overview of the AutoDocumentationExample Repository

If you read the “required reading” this structure should look mostly familiar to you. I will go over the pieces that are different or standout in this configuration. For convenience, I will used / to refer to the top level of the project folder and refer to all files as their path name from /.


/appveyor.yml

Our appveyor.yml file differs slightly in that we are also including an access_token secure environment variable. This is a GitHub access token you will need to generate and then convert to a secure string in your AppVeyor account. This is used to write our changes from the build in AppVeyor back to the repo. This can be named anything but  /psake.ps1 will need to be updated to reflect whatever name is given.


/RELEASE.md

RELEASE.md is where we will put our Release Notes for the current release. As the .md file extension indicates, the file will be in markdown. There will be more details on what to put here later in the Release Preparation section. This file will be copied to the /docs/ folder and added as the ReleaseNotes field on the module manifest. This means that the text here will show up on the ReadTheDocs site as well as the PowerShell Gallery. psake also prepends this to the /docs/ChangeLog.md file


/mkdocs.yml

In Kevin’s blog, he brought this up but said he would go into detail later. Basically, this is used by ReadTheDocs’s mkdocs engine to configure and execute the documentation build process. For our project, we do not write to this directly. In fact, when starting your project, you do not need to include this. psake will overwrite or create this file based on what is in /header-mkdocs.yml , the release notes, the change log, and the function documentation generated by PlatyPS.


/header-mkdocs.yml

This is another new file. As stated above this is what will be used to generate /mkdocs.yml


/psake.ps1

This file is not new, but, it is different from other projects. There are 3 tasks that are of importance to this blog: Build, BuildDocs, and PostDeploy. These are where the magic happens for managing release notes, change log, documentation building, and committing build changes back to the repo.


/docs/

This is the folder where the markdown files used by ReadTheDocs will live.


/docs/index.md

This serves as the landing page and “Home” page for the ReadTheDocs site


/docs/RELEASE.md

This copy of the /RELEASE.md is generated by psake.


/docs/ChangeLog.md

This is the automatically maintained change log. Basically, this has /RELEASE.md prepended to it every build.


/functions/ and /functions/*.md

The function documentation generated by PlatyPS is stored in this folder, one per function in the module.


/Tests/Help.Tests.ps1

The Help.Tests.ps1 for this project includes verifying the function has a HelpUri defined and at least one related link.


Build and Documentation Build Flow

Now that the component and project architecture is out of the way, let’s talk about the project flow that is used here. My flow is probably not ideal and will probably be reworked over time. But, it’s functional enough for now that those looking to add automated documentation to their pipeline could likely drag and drop this into their project.  The basic flow is this:
  1. Modify code in project 
  2. Update comment based help for all public functions
  3. Erase contents of /RELEASE.md (left from the last release) add the changes made in this release
  4. Git add 
  5. Git commit
  6. Git push
  7. AppVeyor webhook triggered (ReadTheDocs is also triggered but this document build will be overwritten once AppVeyor finishes)
  8. /Build.ps1 sets environment and runs /psake.ps1
  9. /psake.ps1:
    1. Initializes
    2. Runs quick unit tests
    3. Build:
      1.  Populates functions in module manifest
      2.  Populates aliases in module manifest
      3.  Version bumps in module manifest
      4.  Prepend version and date to /RELEASE.md
      5.  Prepends /RELEASE.md to /doc/ChangeLog.md
    4. Runs all tests (unit tests are re-run to ensure build changes have not affected them)
    5. BuildDocs:
      1. Imports the freshly built module
      2. Grabs content of /header-mkdocs.yml
      3. Copies the /RELEASE.md to /docs/RELEASE.md
      4. Runs New-MarkdownHelp from PlatyPS to build the function documentation in /docs/functions/
      5. Generates the /mkdocs.yml based on the results of the above steps.
    6. Deploy (if triggered by !deploy in the commit)
    7. PostDeploy:
      1. Commits all the changes made by the build back to the repo with [ci skip]
      2. Creates a GitHub Release if !deploy is in commit.
  10. GitHub repo is updated with build changes
  11.  ReadTheDocs webhook is triggered (AppVeyor ignores because of the [ci skip] in the commit message)
  12. ReadTheDocs builds the documentation website
  13. Git Pull (You need to pull the changes made from the build process back into your local Git repo).
Continue to Part 2